front panel overview
12
15
17
18
13
14
16
feature
purpose
12
Power connector
13
1-LINE port
14
2-EXT port
15
USB port
16
Handset port (HP Officejet 4250 Series only)
17
Rear cleanout door
18
Rear cleanout door access tab
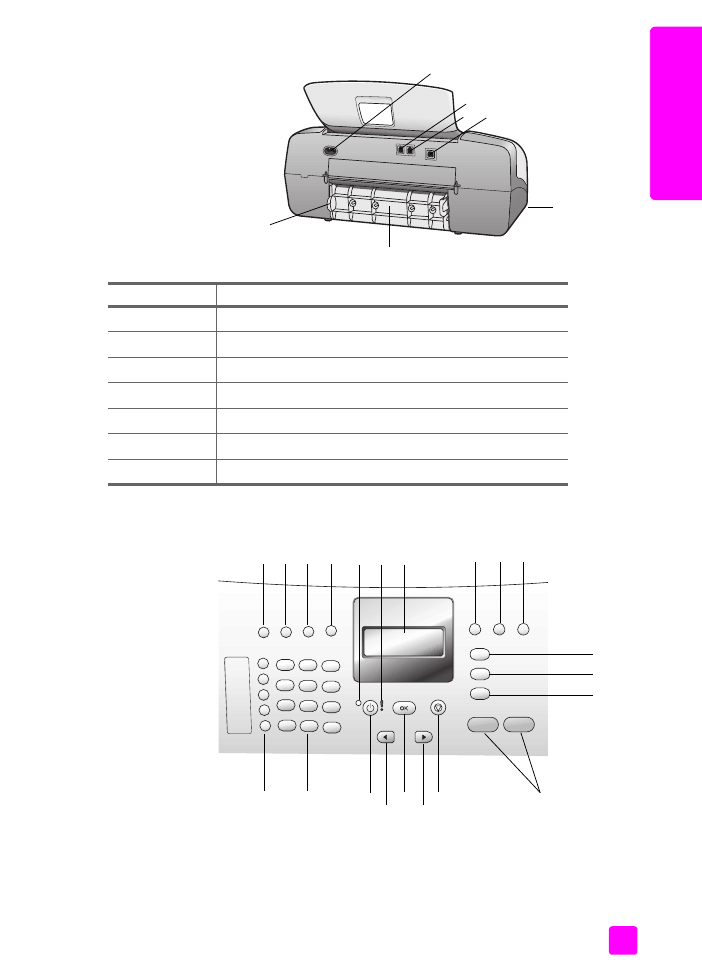
1
2
3
4
7
8
9 10
5
6
11
12
13
14
15
16
17
18
19
20
21

hp officejet 4200 series
chapter 1
6
hp o
ff
icejet o
ver
vi
ew
feature
purpose
1
Answer Mode
: Switch between four answer settings, Fax (Fax)
mode, Telephone (Tel) mode, Fax and Telephone (FaxTel) mode
(only available on the HP Officejet 4250 Series), and Answering
Machine (AnswerMachine) mode. See
set the answer mode
on
page 44 for an explanation of these settings.
2
Fax Resolution
: Choose the resolution in which a fax will be sent.
3
Redial/Pause
:
Redial the most recently dialed fax number. Also, use
to insert a pause while entering a telephone number.
4
Speed Dial
: Select a number from programmed speed dial entries.
Use the Speed Dial button, the arrows, or the keypad numbers on
the front panel to navigate to a speed dial fax number.
5
Status Light
: Indicates whether the HP Officejet is on, off, or busy.
6
Attention Light
: Indicates an error condition.
7
Front Panel Display
:
View menus, prompts, status messages, and
error messages.
8
Flash
: Cancel a fax and bring up a dial tone. Also, use to answer
a call waiting (handset model only).
9
Photo Fit to Page
: Resize a copy of a photo, maintaining its
proportions, to fit within the printable area of a full-size page.
10
Setup
:
Access the menu system for reports, speed dial setup, fax
settings, tools, and preferences.
11
Fax
:
Select the fax function. Press the Fax button repeatedly to scroll
through the Fax menu settings.
12
Scan
:
Select the scan function. Press the Scan button repeatedly to
scroll through the Scan menu settings.
13
Copy
: Select the copy function. Press the Copy button repeatedly to
scroll through the Copy menu settings.
14
Start Black
,
Start Color
: Start a black or color fax, copy, or scan job.
15
Cancel
:
Stop a job, exit a menu, exit settings, or exit the speed dial
menu.
16
Right Arrow
: Increase values, or go forward when viewing settings
on the front panel display.
17
OK
:
Select the current menu setting on the front panel display. Also,
use to respond to prompts on the front panel display.
18
Left Arrow
:
Decrease values, or go back when viewing settings on
the front panel display.
19
On
:
Turn the HP Officejet on or off.
Warning!
When the HP Officejet is off, a minimal amount of
power is still supplied to the device. Unplug the power cord to
completely disconnect the power supply to the HP Officejet.

user guide
hp officejet overview
7
hp o
ffi
cejet o
ver
vie
w
20
Keypad
:
Enter fax numbers, values, or text.
21
One-Touch Speed Dial
: Dial a fax number quickly by pressing a
one-touch speed dial button. The 5 one-touch speed dial buttons
each hold 2 numbers and correspond to the first 10 fax numbers
entered during speed dial setup.
feature
purpose

hp officejet 4200 series
chapter 1
8
hp o
ff
icejet o
ver
vi
ew